Costa Rica to Nicaragua Border Crossing: The Complete Guide
The Costa Rica to Nicaragua border crossing at Penas Blancas was the longest and most confusing of all the border crossings I’ve completed in South and Central America. That’s why I’m sharing a full guide below!
We crossed the border by foot, and this guide is geared toward other travelers doing the same. Our journey took us from La Fortuna, Costa Rica to San Juan del Sur, Nicaragua in one day. You can also start your journey in Liberia or San Jose, Costa Rica.
In this Costa Rica Nicaragua border crossing guide, I’m including instructions for all of the above. Let’s get to it!
NOTE | I completed this border crossing personally, and I’m doing my best to keep this article updated. If you find this guide helpful, please comment below with any changes or updates! Together, we can help future travelers navigate the Costa Rica Nicaragua border safely.
Check out my other border crossing guides…
Nicaragua to El Salvador Border Crossing Guide
Panama to Costa Rica Border Crossing Guide
El Salvador to Guatemala Border Crossing Guide
Guatemala to Honduras Border Crossing Guide
Honduras to Guatemala Border Crossing Guide
Guatemala to Belize Border Crossing Guide
Belize to Mexico Border Crossing Guide
Ecuador to Colombia Border Crossing Guide
Peru to Ecuador Border Crossing Guide
Sailing the San Blas Islands to Cross From Colombia to Panama (Coming Soon!)
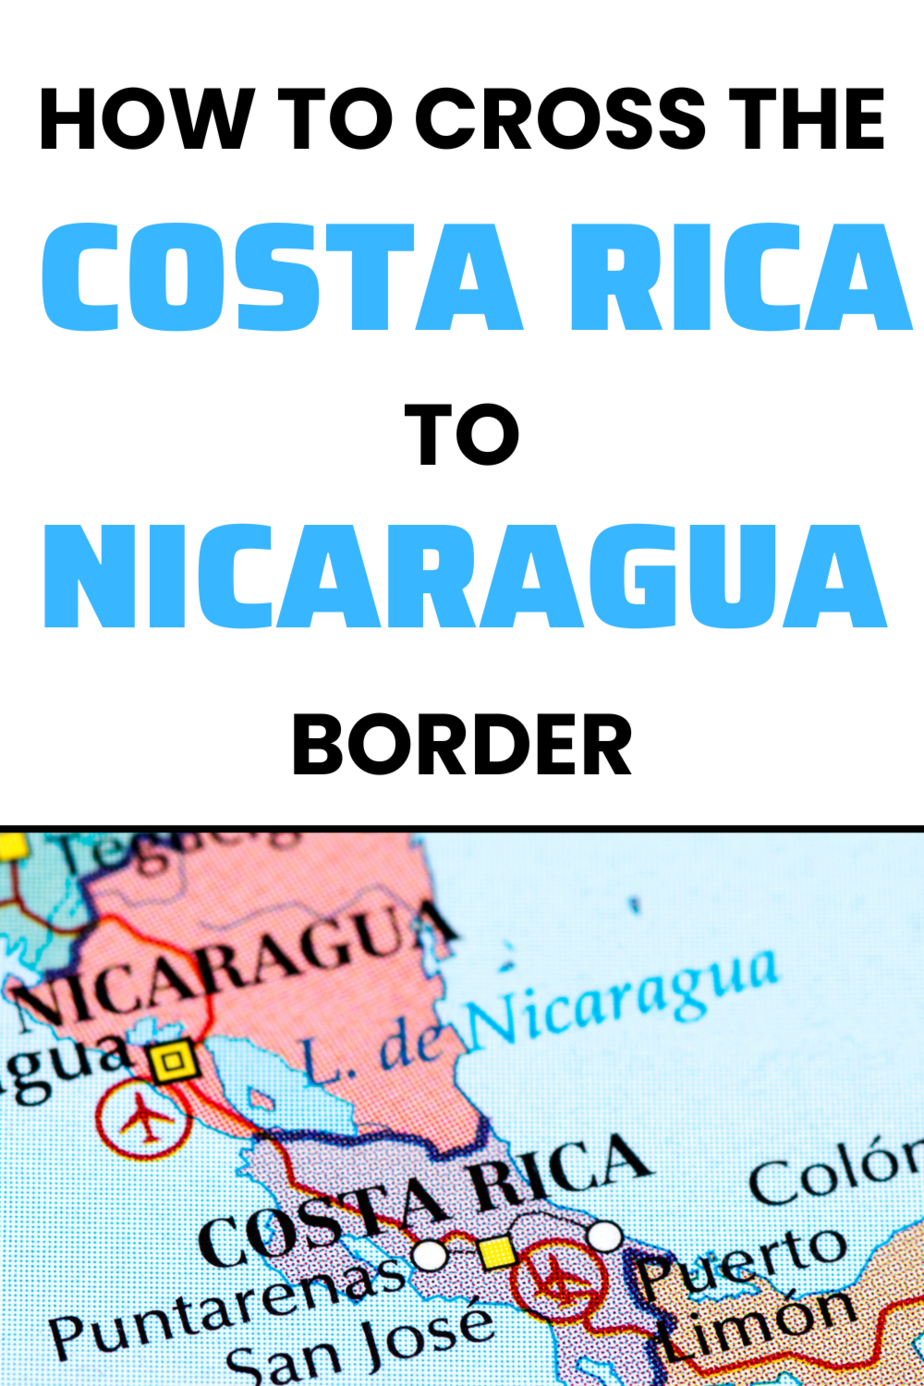
Costa Rica to Nicaragua Border Crossing Locations
Unlike some of the other South and Central American countries we’ve passed through, there is really only one main border crossing between Costa Rica and Nicaragua. It is called Penas Blancas, and it is on the west side of each country.
This is convenient if you’re crossing into Nicaragua, because most of the tourist destinations are on the west / Pacific side.
Costa Rica to Nicaragua Border Crossing: The Complete Guide
Not only is the Penas Blancas border itself more confusing than other ones I’ve come across in the region, but the process of actually getting to the border and then onto your final destination is also confusing.
That’s why I’m sharing ALL the information below on how to get to/from the border from various locations in Costa Rica and Nicaragua. I’ve also written a play-by-play of what to expect at the border itself, because there are a lot of steps at this one.
How the Penas Blancas Border Crossing Works
Here is a very quick overview of what to expect at the Penas Blancas border crossing. Don’t worry, you can scroll further down to read my in-depth account of our experience at this border.
In order to complete the Costa Rica to Nicaragua border crossing at Penas Blancas, you’ll need to follow this route:
- Get to Penas Blancas (more instructions below)
- Pay Costa Rica exit tax
- Exit Costa Rica
- Walk 300m across no man’s land
- Get vaccine card checked twice
- Enter Nicaragua and pay entry tax
- Chicken bus or taxi to onward destination (more instructions below)
Travel Requirements for the Costa Rica to Nicaragua Border
Before you complete this border crossing, you should also be prepared with some important items or details.
These travel requirements include:
- Pre-booked accommodation in Nicaragua: Immigration officials will ask for your address in Nicaragua so it’s good to have at least your first night booked. We stayed at Saltwater Hostel in San Juan del Sur. It had great chilled vibes and was only $10/night for a dorm bed!
- USD cash: There is an exit tax and an entry tax at this border, and it’s required to pay in USD cash. So definitely be sure to have this on hand before you get to the border!
- Six-months passport validity: It’s always recommended to have a minimum of six months of passport validity and at least two empty passport pages before you cross any international border. Some countries turn you away without this.
- Check entry requirements: It’s different for every nationality, so check on your government website. Currently, USA and UK citizens can enter Nicaragua for 90 days. Note that Nicaragua is part of the CA-4 visa agreement, meaning your 90 days are spread across the four member countries (Nicaragua, El Salvador, Honduras, and Guatemala). This is something to consider if you’re backpacking Central America.
- Yellow fever vaccine: You may be required to show a yellow fever vaccination certificate if you’ve traveled in Argentina, Bolivia, Brazil, Colombia, Ecuador, French Guyana, Panama, Venezuela, Paraguay or Peru. However it’s a bit unclear if that’s only for when you enter Nica directly from those countries. We’d recently been in four of those countries but weren’t asked to show our certificates.
- Check health requirements: I’m sure you know that things are constantly changing regarding COVID-19 travel rules and you shouldn’t trust travel blogs regarding this – go to the official embassy website. Currently to enter Nicaragua, we needed to show our vaccination cards. If you’re unvaccinated you need a negative COVID test.
Is Proof of Onward Travel Required?
From our research, proof of onward travel was NOT required to enter Nicaragua. We were not asked for any proof of onward travel at the border.
If you are traveling in the opposite direction, from Nicaragua to Costa Rica, then you WILL need proof of onward travel. There are ways to get this officially, without spending any money. I share more details on onward travel for Costa Rica in this border crossing post.
Where to Begin Your Journey in Costa Rica
Our first major pain point for the Costa Rica to Nicaragua border crossing was figuring out where we needed to begin our journey.
It is easiest to travel from Costa Rica to Nicaragua if you begin your journey in Liberia or San Jose:
From Liberia: Grupo Transbasa bus line has direct routes to the Penas Blancas border every 45 minutes from 5am-6:30pm daily. There is a link to their current schedules on their website.
From San Jose: Ticabus is an international bus line that can take you directly from San Jose, Costa Rica to Managua, Nicaragua. You will get off the bus at the border and then get back on the same bus. You can view schedules and purchase tickets online – although be warned their website is a bit wonky.
However, both Liberia and San Jose are big cities that we weren’t nearby or really desired to spend any time in. We also had no desire to end up all the way in Managua, Nicaragua – which is the least safe city in the country.
What We Did Instead: La Fortuna to Penas Blancas
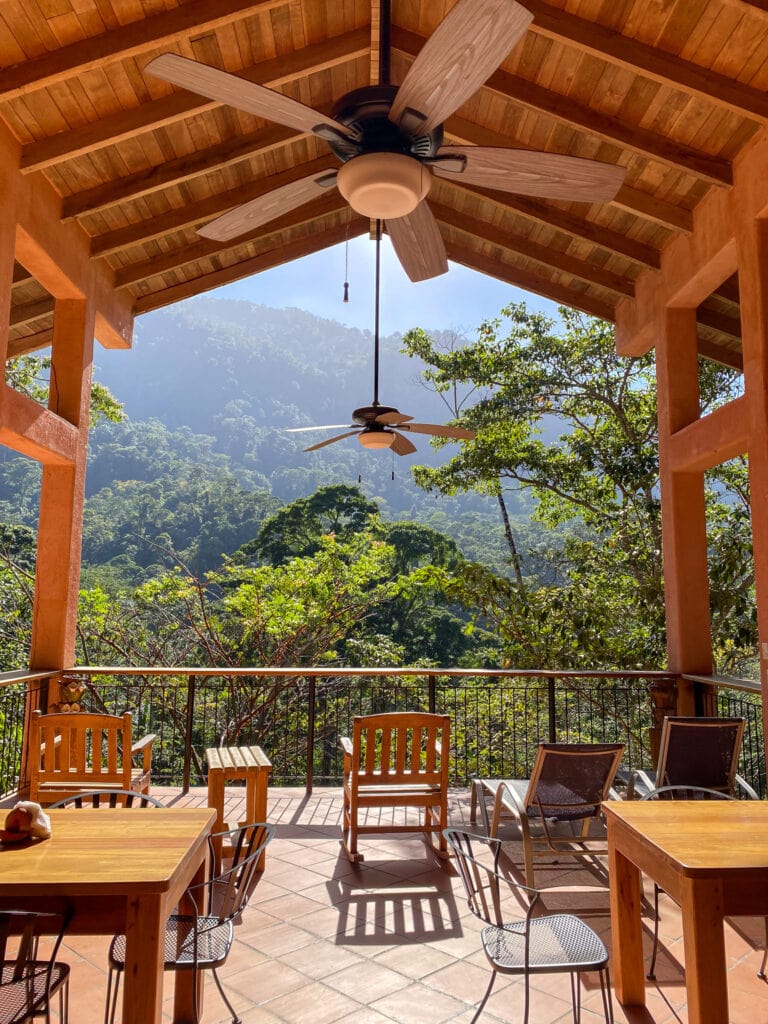
Personally, we were in La Fortuna, which is a wonderful little town surrounded by hot springs, waterfalls, the Arenal Volcano, and adventure sports. You’ll probably be visiting La Fortuna while in Costa Rica!
Rather than take a terrible and convoluted route from La Fortuna to Liberia (or spend a lot of $$$ on a shuttle), we decided instead to attempt the border crossing directly from La Fortuna. We found ZERO information on this route online, but luckily we got by with the help of some friendly Costa Ricans and probably some luck, too.
Ultimately the journey from La Fortuna to Penas Blancas was not difficult at all – it was just a bit unnerving since we were winging it. I’ve included full directions below so you can complete the same journey with a bit more confidence!
Costa Rica to Nicaragua Border Crossing at Penas Blancas: The Complete Guide
Okay, this is a long and confusing one, folks. But I took notes during our border crossing so I could give you the full details!
Our full journey went a little like this: La Fortuna > El Tanque > Upala > Penas Blancas > Border Crossing > La Virgen > San Juan del Sur.
PHEW! Read on for the full directions.
1. Get to El Tanque from La Fortuna, Costa Rica
A few days before our border crossing, Dan and I lurked around the La Fortuna bus station and spoke to some locals about the best way to attempt this border crossing. With their help, we discovered a route that would take us to Penas Blancas with (hopefully) just two buses.
Our first step was to get from La Fortuna to El Tanque, a very small town just about 15 minutes away by car.
La Fortuna to El Tanque by Bus
It is possible to take the public bus from La Fortuna to El Tanque (but I don’t recommend it – read on). The bus leaves at 6:30am, but it’s recommended to get to the bus station for 6:15am. It costs 750 CRC (~$1.25 USD) and takes 15 minutes.
HOWEVER! The day Dan and I crossed the border, we waited around at the bus station and 6:30am came and went. The bus was late! We started getting anxious because we were told we needed to be in El Tanque by 7am-7:20am to catch our next bus. If we missed that bus, our entire border crossing day was screwed.
La Fortuna to El Tanque by Taxi/Uber
So… we ordered an uber. Luckily, the uber came in about one minute to pick us up at the bus station. The total journey took 15 minutes and cost 2,370 CRC (~$4 USD).
For the uber directions, we just put in El Tanque, and then told the driver that we needed to get to the bus stop for the bus to Upala (more details below). Luckily he knew where that was.
Ultimately, I definitely recommend just taking an uber to El Tanque and don’t screw around waiting for the bus. It’s not worth it if you miss it!
Cost: 2,370 CRC / ~$4 USD total or ~$2 USD per person
Time: 30 minutes
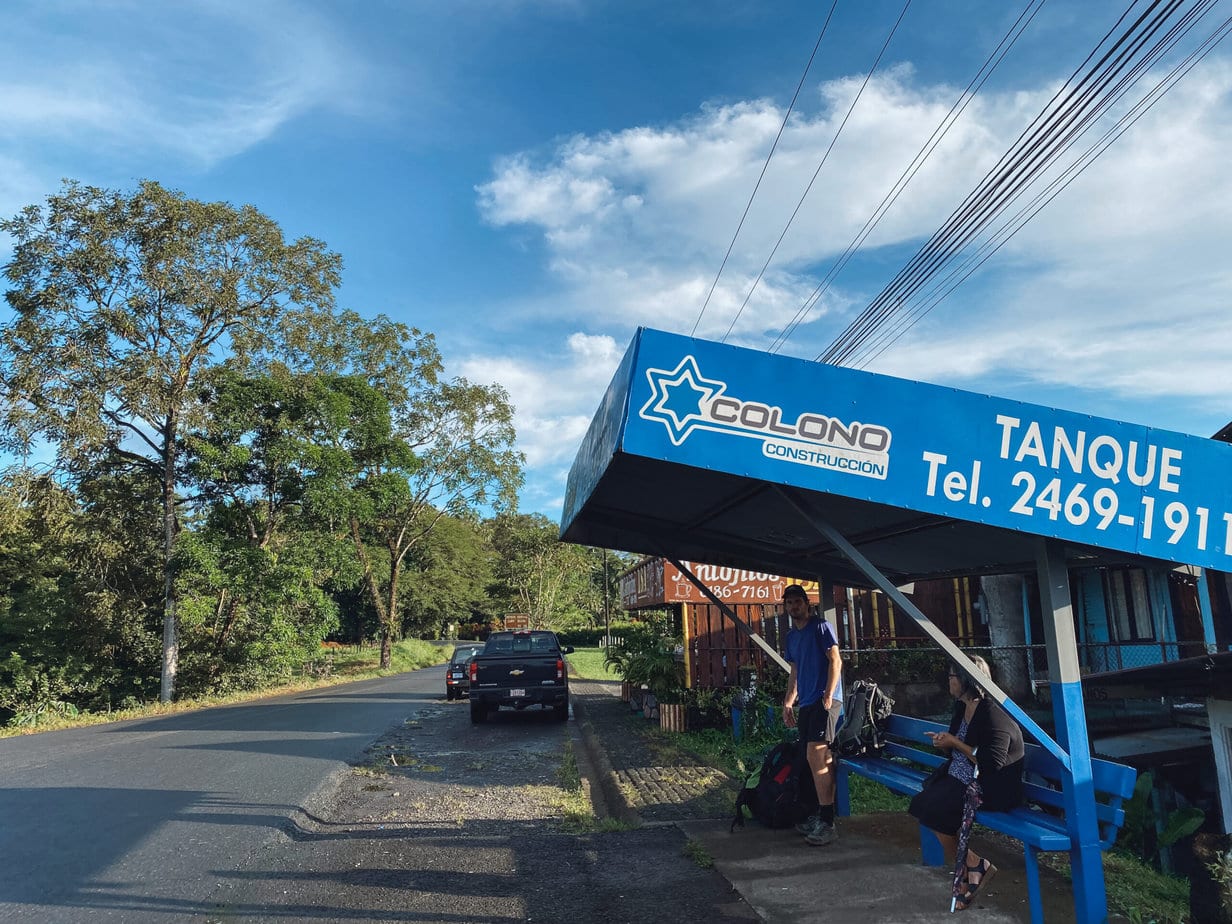
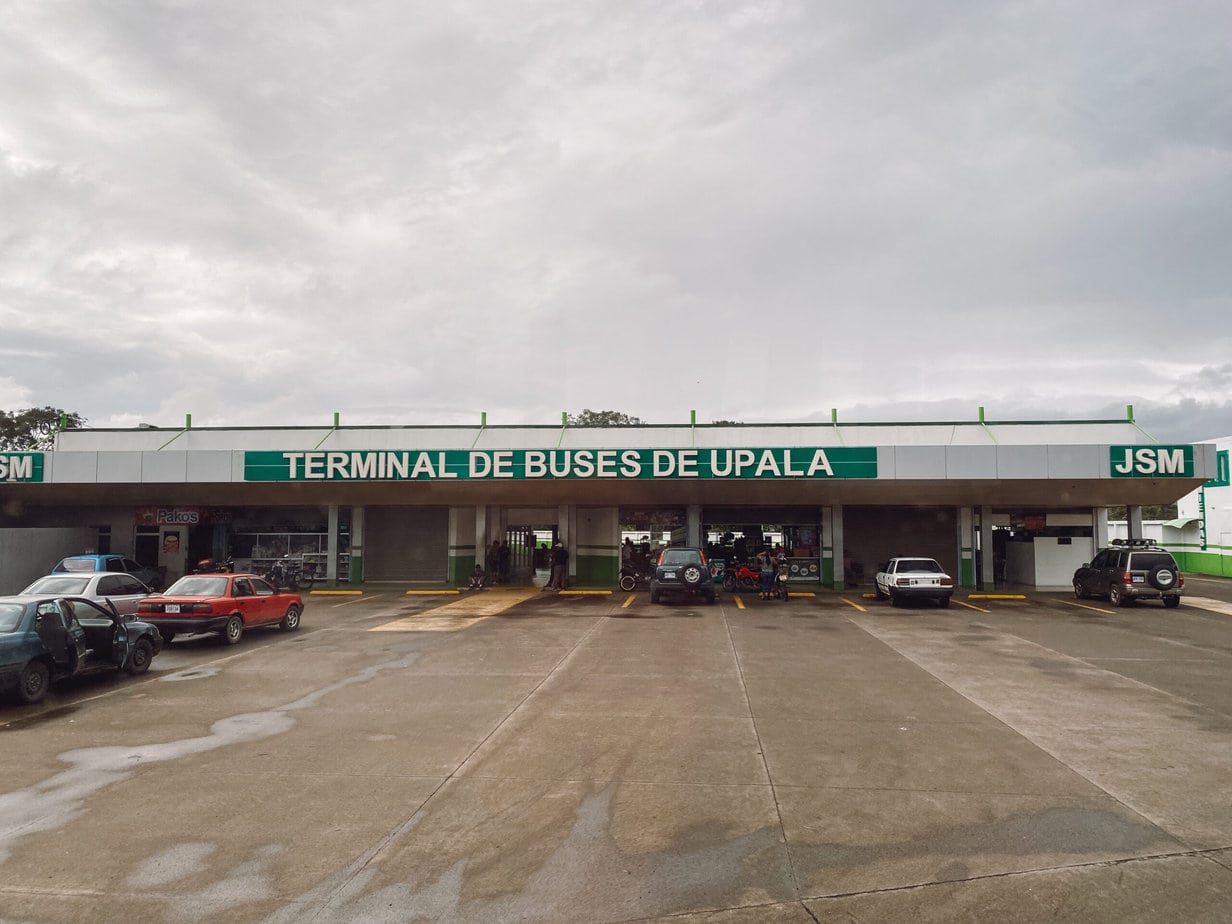
2. Bus El Tanque – Upala
There is no bus station in El Tanque, just a small shelter on the side of the road. The bus stop is located as you turn left off El Colono / 142 onto another road that’s also called 142 (at this intersection, the original 142 coming from La Fortuna changes into 141). To help, see this location pin on Google Maps.
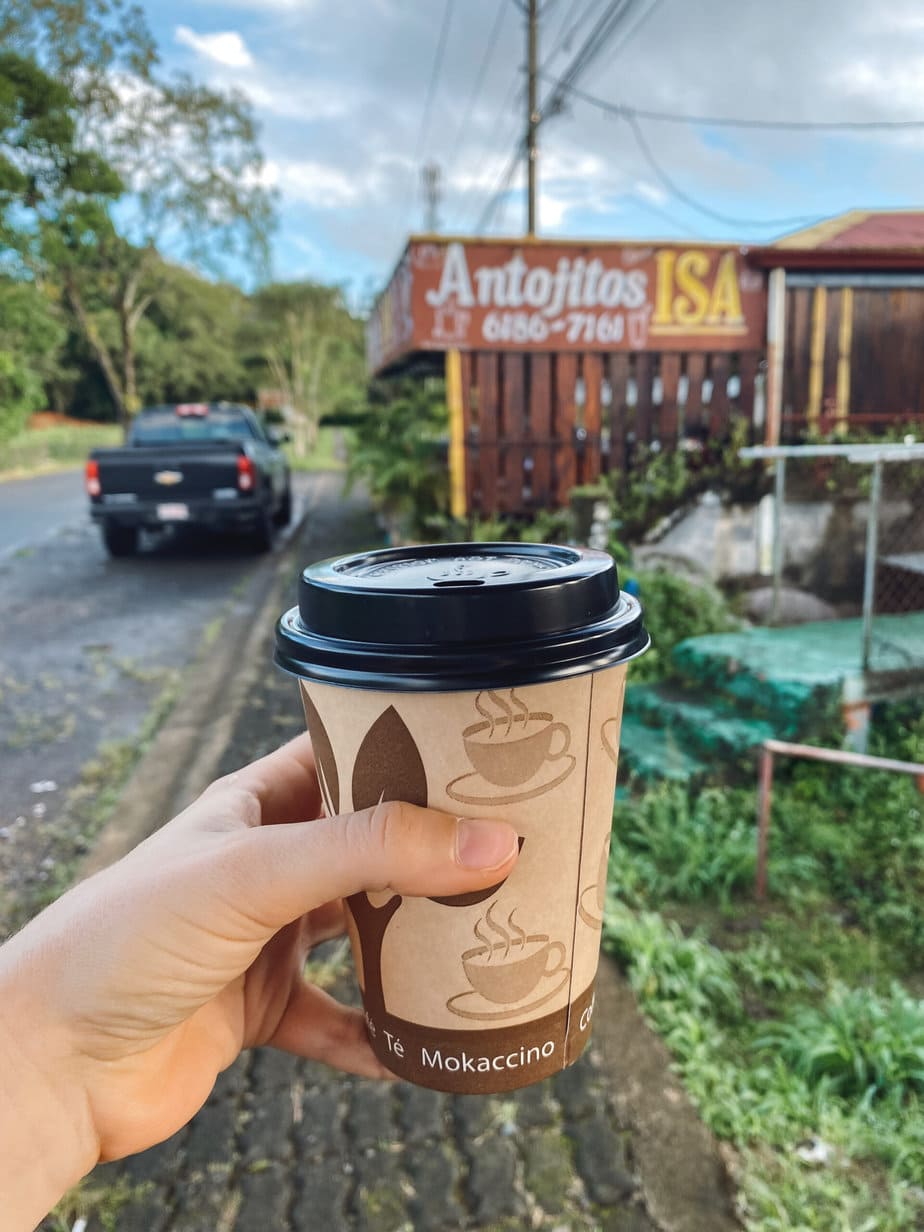
Another way to find the bus stop is to put in “Antojitos ISA” into Google Maps. This is a small soda located right next to the bus stop. You could even get breakfast here if you have time. I got a to-go coffee with milk for 1,000 CRC. Needs must at 7am, lol.
The next bus you need to get is from El Tanque to Upala (the same bus will continue on to Penas Blancas after a break in Upala).
This bus originates elsewhere but is supposed to pass through El Tanque around 7am-7:20am daily. You can check at the tourist kiosk near La Fortuna bus station to confirm the timing, which is what we did.
Right at 7:10am, a double decker blue Transpisa bus arrived. It said Upala on the front windshield, not Penas Blancas. We hailed it and got on.
The bus tickets cost 2,900 CRC (~$4.88 USD) per person and there was plenty of room to sit. We stored our big backpacks in the under hold.
As a side note, the bus we were originally supposed to take from La Fortuna never passed through El Tanque! So we were really glad we took an uber, to say the least.
Cost: 2,900 CRC / $4.88 USD per person
Time: 10 minutes waiting, 2.5 hours to Upala
3. 20 Minute Break at Upala Bus Terminal
We arrived to Upala bus station around 9:40am. Keep in mind that lots of people get on and off at various stops, and there are about three previous stops in Upala before you get to the main bus terminal (it is obvious when you are there).
Once at Upala, we all had to get off the bus, but our big backpacks remained in the hold. This is a relatively small bus station with a few sodas, benches, and bathrooms. It costs 350 CRC (~$.60 USD) to use the bathrooms.
Cost: –
Time: 20 minutes
4. Bus Upala – Penas Blancas
We reboarded our bus at 10am and paid the driver for our bus ticket from Upala to Penas Blancas. This cost 4,500 CRC ($7.58 USD) for two people. We were told only 4,200 CRC (so, 2,100 CRC per person), however the driver only had change for 4,500 CRC…. this happens a lot in Costa Rica.
Next, our bus traveled onward from Upala to Penas Blancas. This part of the journey went really smoothly and took about three hours. We arrived to the border around 1pm, so yes, it was a long morning!
Cost: 2,250 CRC / $3.78 USD per person
Time: 3 hours
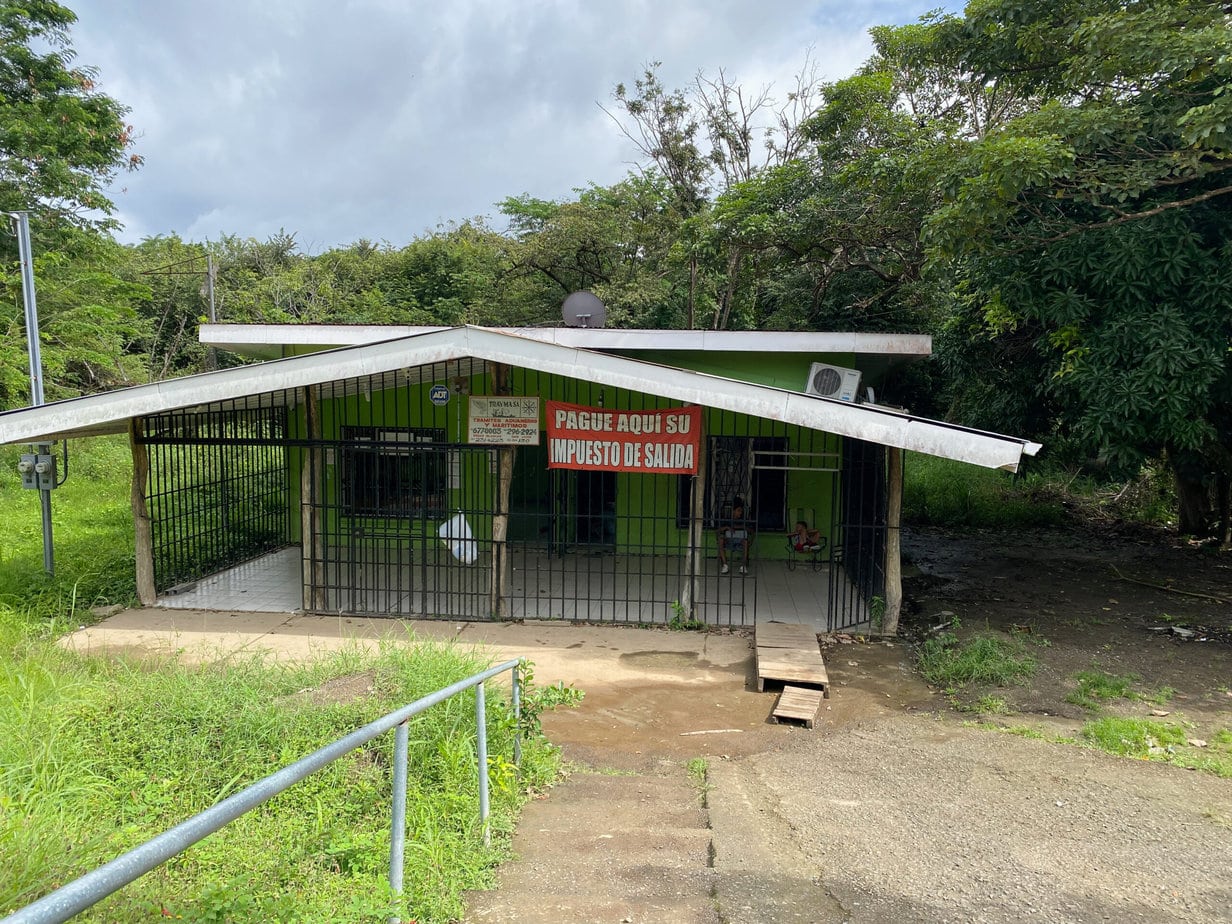
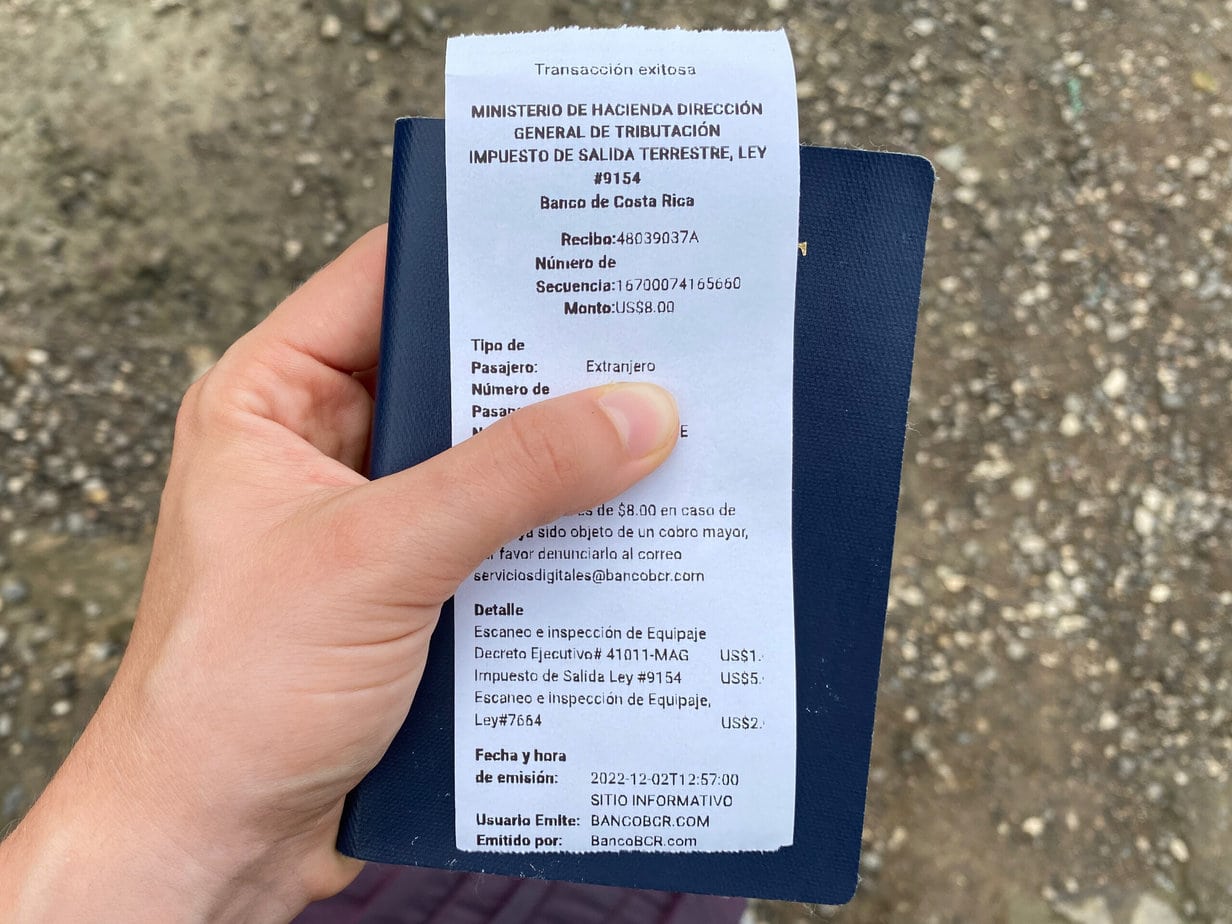
5. Pay Costa Rica Exit Tax
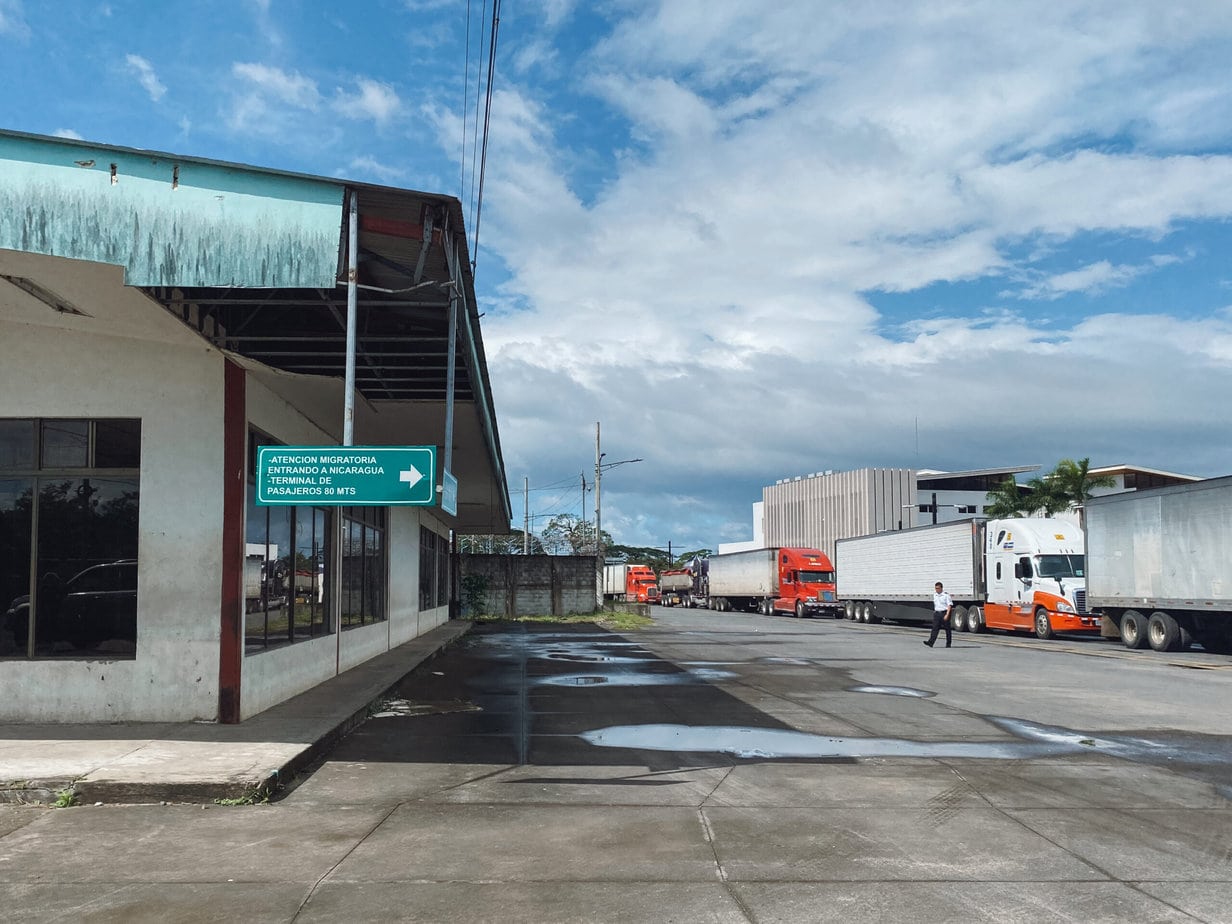
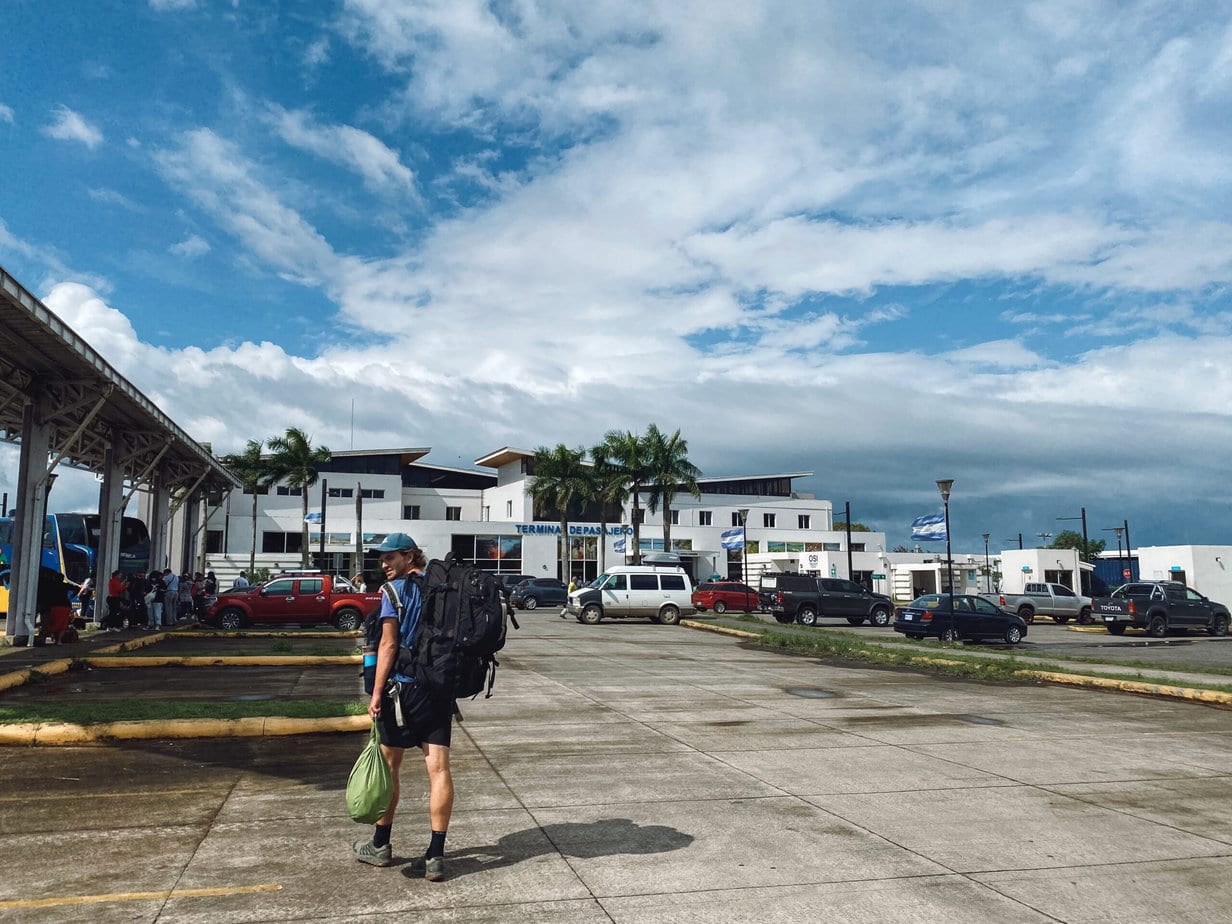
Once we arrived at the Penas Blancas border, the bus driver directed us to these super random houses. If you face away from border they’re on your left (see the photo below). Here, we had to pay the Costa Rica exit tax (“impuesto de salida”).
Weirdly, there are two competing houses here. You’ll probably see a couple people yelling you over, urging you to go into their house and not their neighbor’s. Yes, these look like houses people live in. And yes, they’re actually official (somewhat).
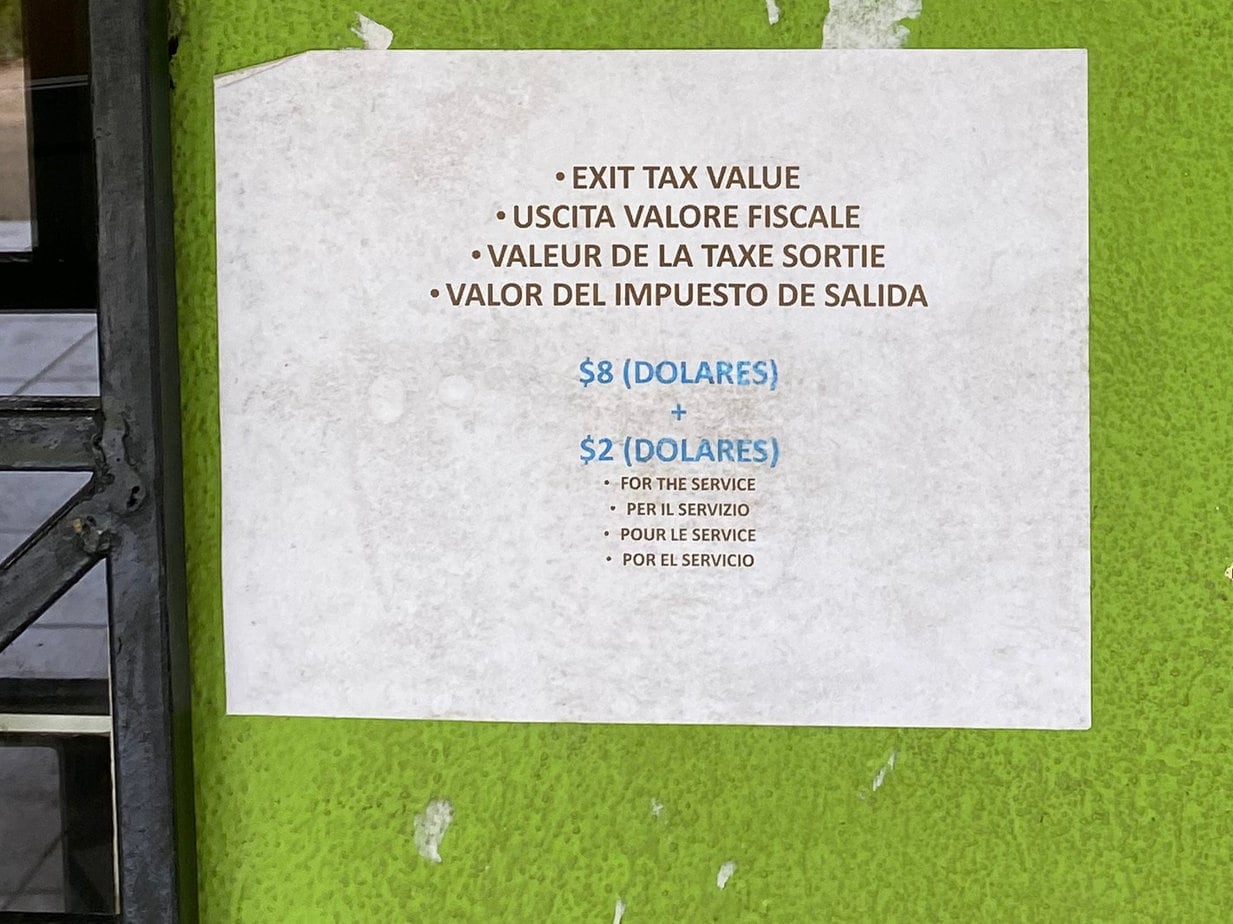
We went to the house on the left. There is a sign saying $8 exit tax with a $2 service charge. That service charge was annoying but we just showed our passports, paid, and got our receipts (that said $8…). Please note that NO cards are accepted and they don’t always give you change, according to reports. You also need to pay in USD and not CRC.
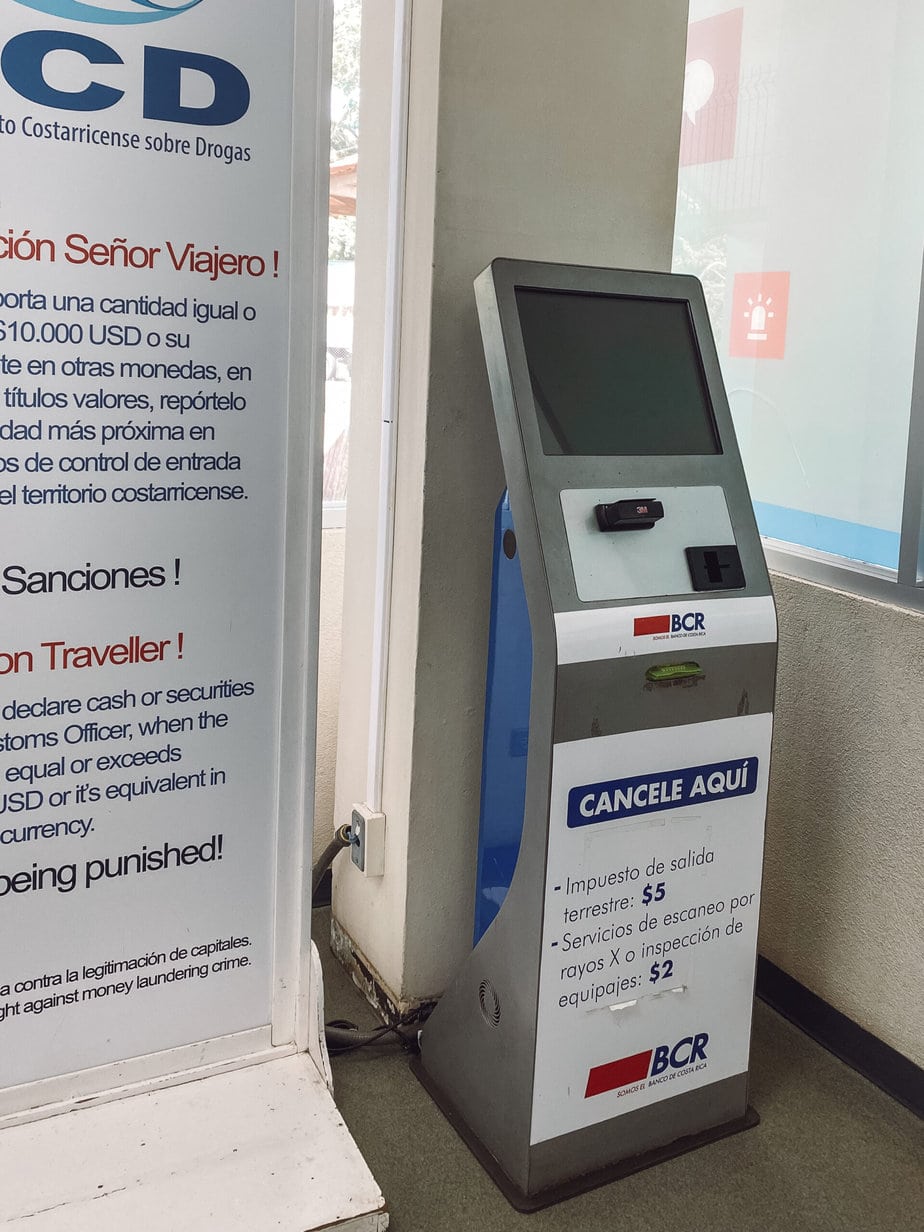
Note: Later in the Costa Rica immigration building we did see a console / ATM-thing that said “impuesto de salida” and it only charged $5 exit tax and a $2 “luggage fee”, and you could also pay with card. This definitely looked more official, and was only $7 compared to $10 at the odd houses. However the screen was black and I’m unsure it was operable. To be honest, it was annoying, but worth the potential extra $3 to not have to walk there and back in the heat with our backpacks…
UPDATE | According to traveler Vincent who commented below, it is now possible to pay the exit fee via credit card with a QR code provided at the customs building itself. Here is a link to the payment page in case the QR code does not work. This cost him $8.
Cost: $10 USD per person
Time: 15 minutes
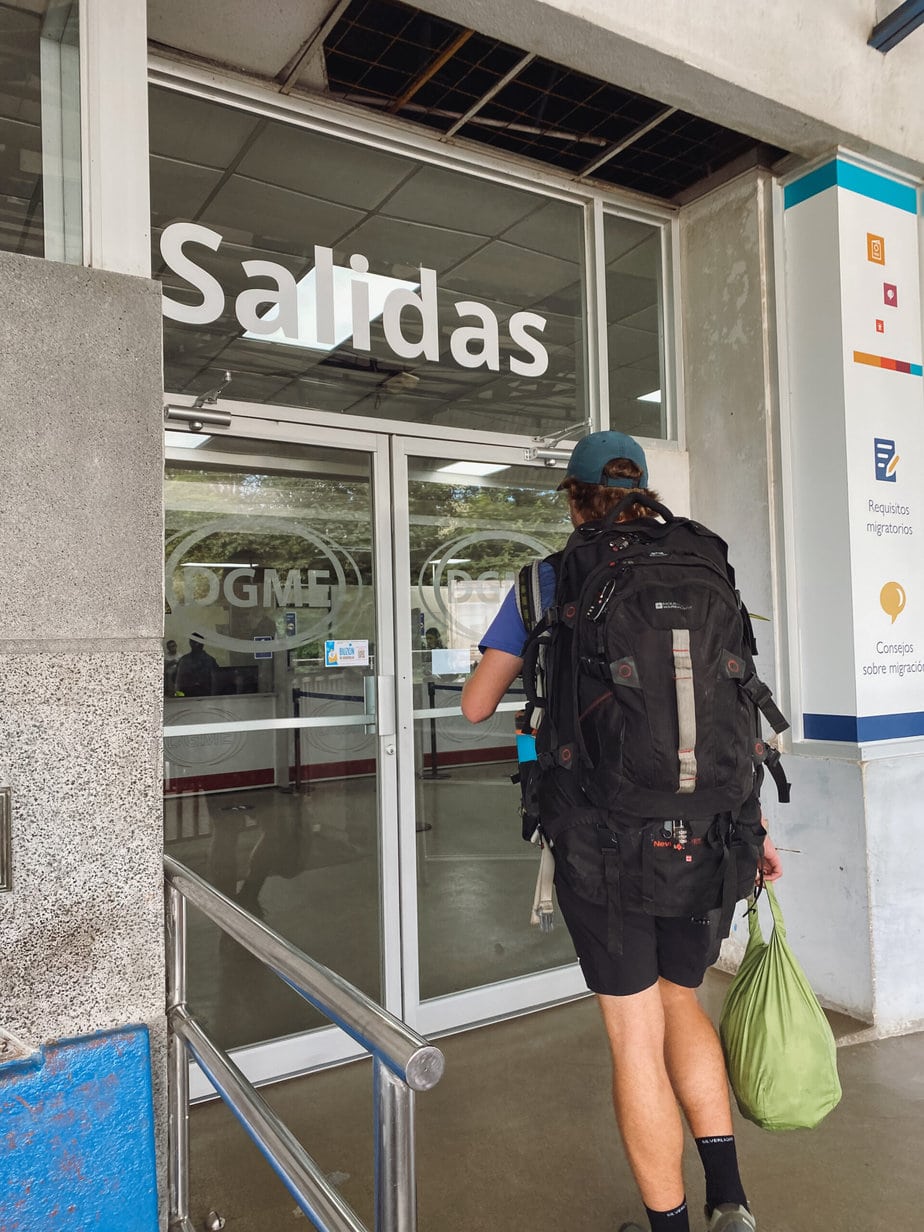
6. Exit Costa Rica
From the strange exit tax houses, we walked right toward the Costa Rica immigration building. It is on your left hand side and the door says “salida”.
We waited in a short line here, and the Costa Rican immigration officials checked our passports and stamped them – no questions. They did look at the exit tax receipt and approve it, so it’s not a complete scam.
Outside this building there is a free toilet. I recommend you use it as the next few steps take a long time.
Cost: –
Time: 15 minutes

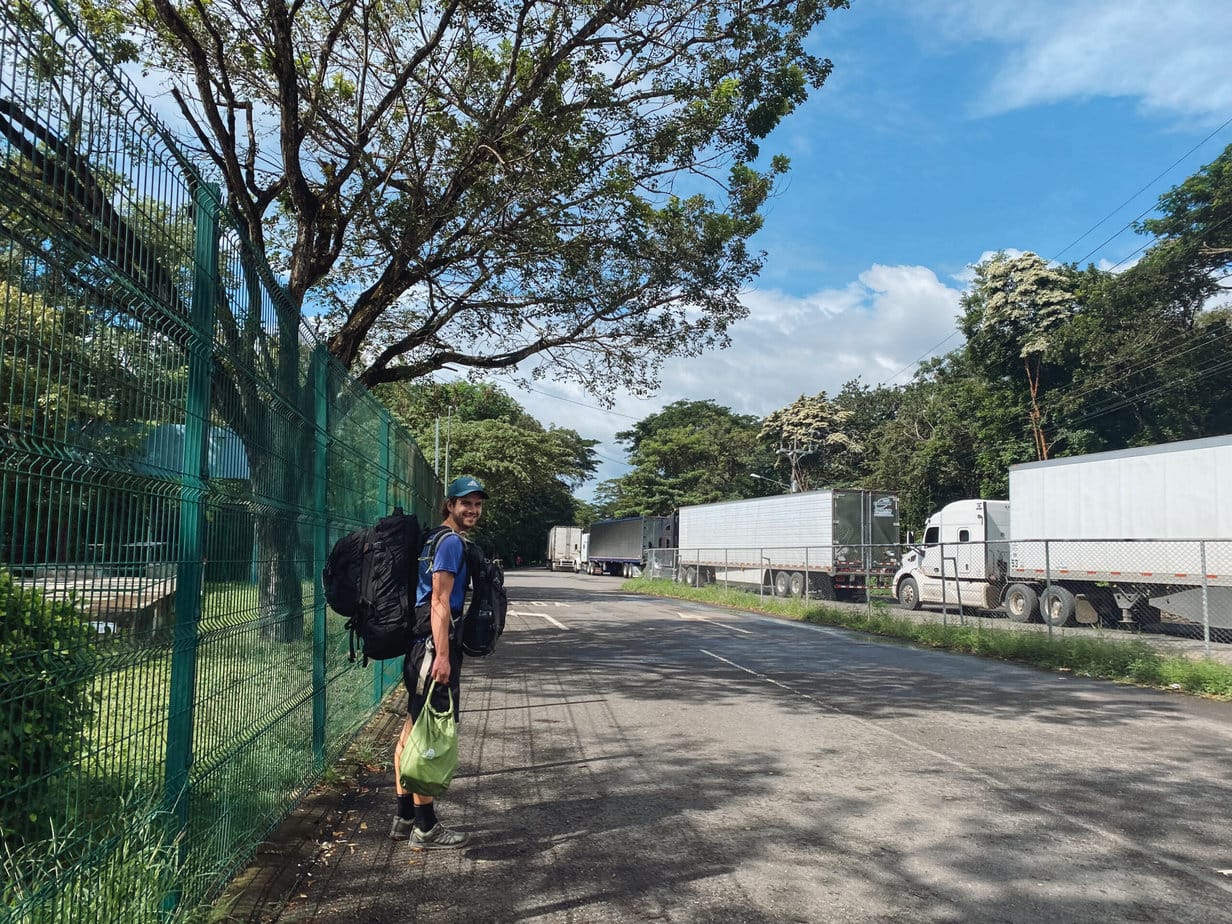
7. Cross No Man’s Land
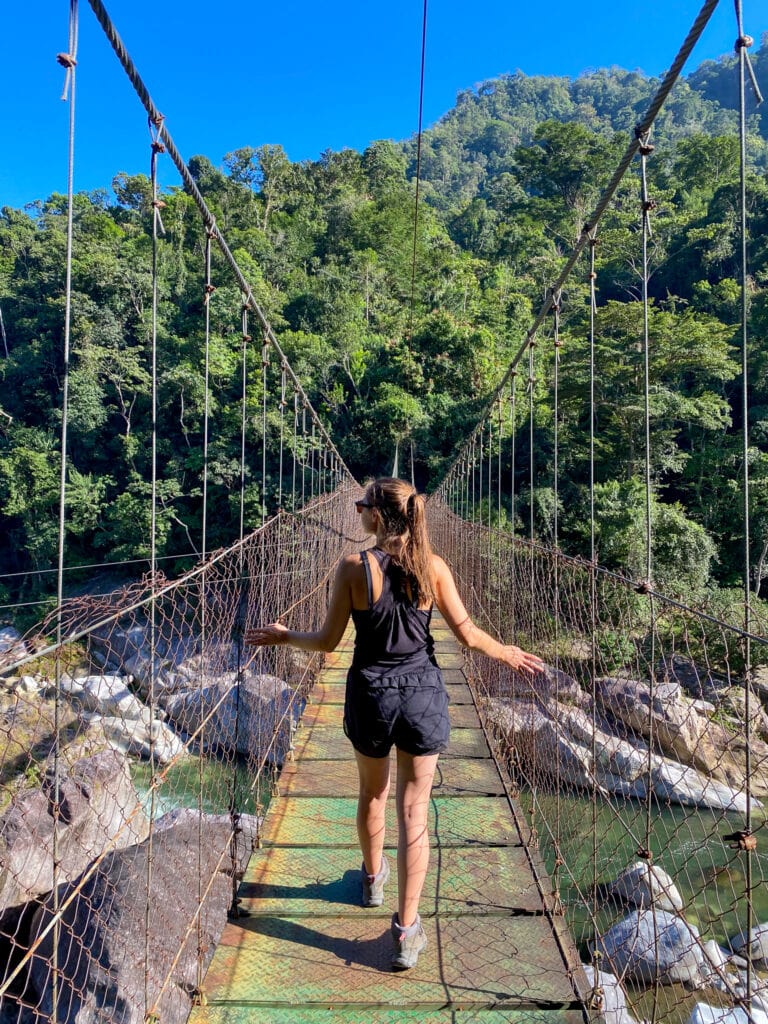
Next, you have to walk across no man’s land between Costa Rica and Nicaragua. This no man’s land is no joke – it’s about 300 meters along a very hot paved road. This was our longest no man’s land so far on our travels!
I did not find the area sketchy or concerning at all. There is a police presence, as well as other travelers crossing on foot. When we crossed the road was also at a standstill with truck traffic.
Keep your passport and vaccine card accessible during this walk. After about 120m we had to show our passports to a Costa Rican border patrol, who checked that we had our exit stamp.
After an additional 60m we had to show our passports again to another police guy (I’m assuming Nicaraguan). Here, we also had to show our vaccine cards to a health official.
Then, we walked another around 60-80m before we had to cross the road when we saw a sign for Nicaraguan immigration. It’s easy to find this because there is a big parking lot with a big white building and a few other buildings.
Cost: –
Time: 20 minutes
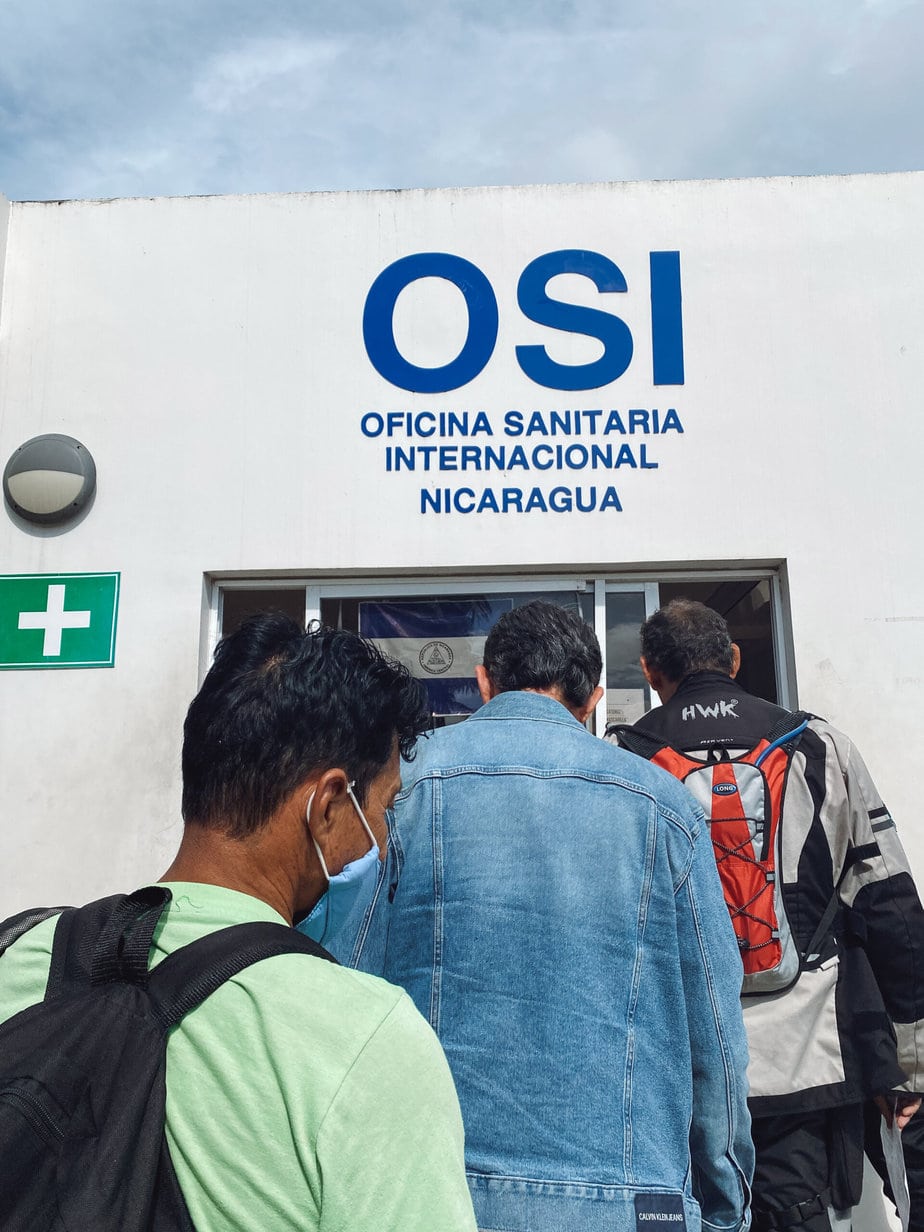
8. Show Vaccine Card
Once in the big parking lot, there is a smaller building for health requirement checks, and a larger main immigration building. We decided to go to small building first because the line was short, and we figured it would be awful to wait in long line at the main building only to find out we had to get health stuff sorted first.
I’m so glad we did this because later on we saw a lot of people get turned away after waiting hours in line because they hadn’t gotten their health documents checked first!
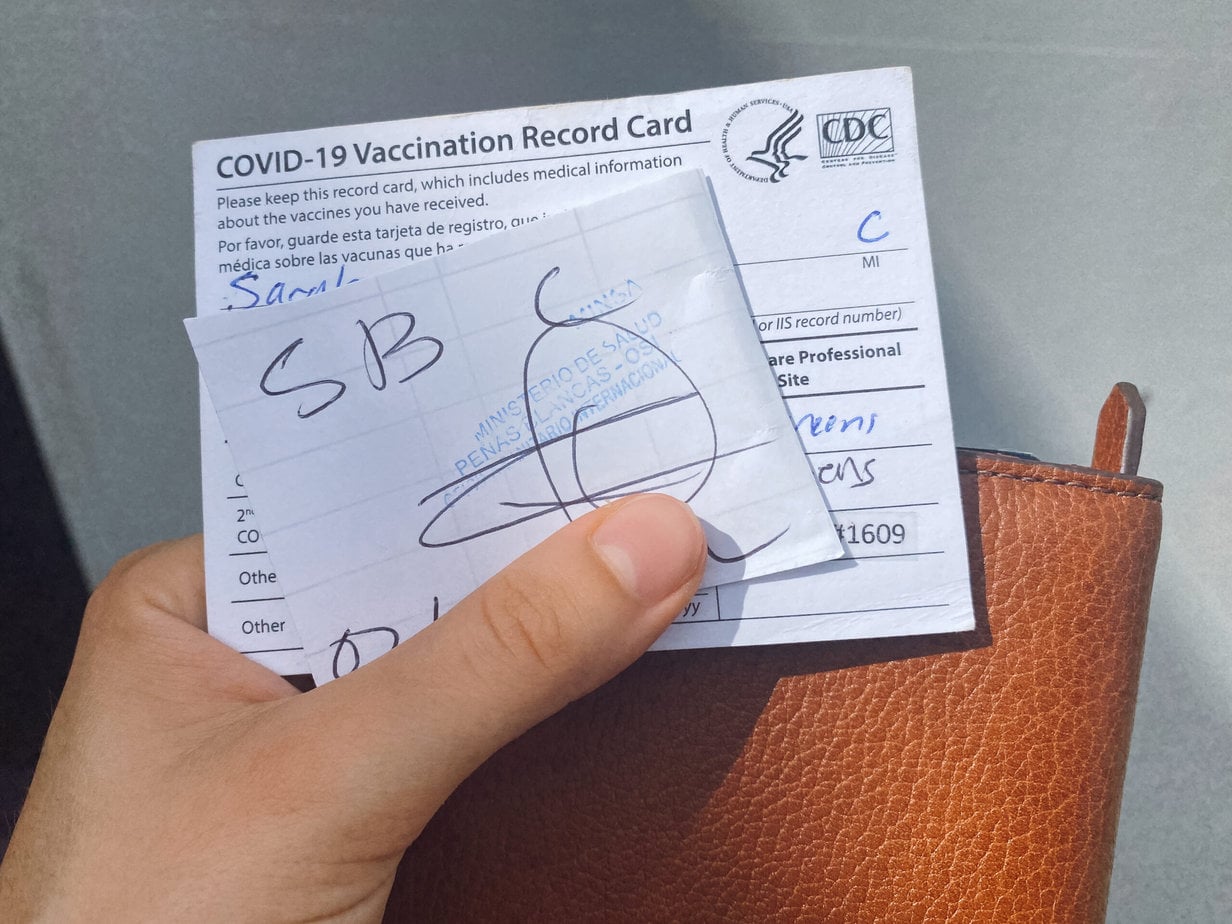
After waiting in line, we showed our vaccine cards again and got a tiny piece of paper handwritten with our initials and the date. That was it!
Note: Don’t lose this paper! It looks unassuming but it’s very important later.
Cost: –
Time: 20 minutes
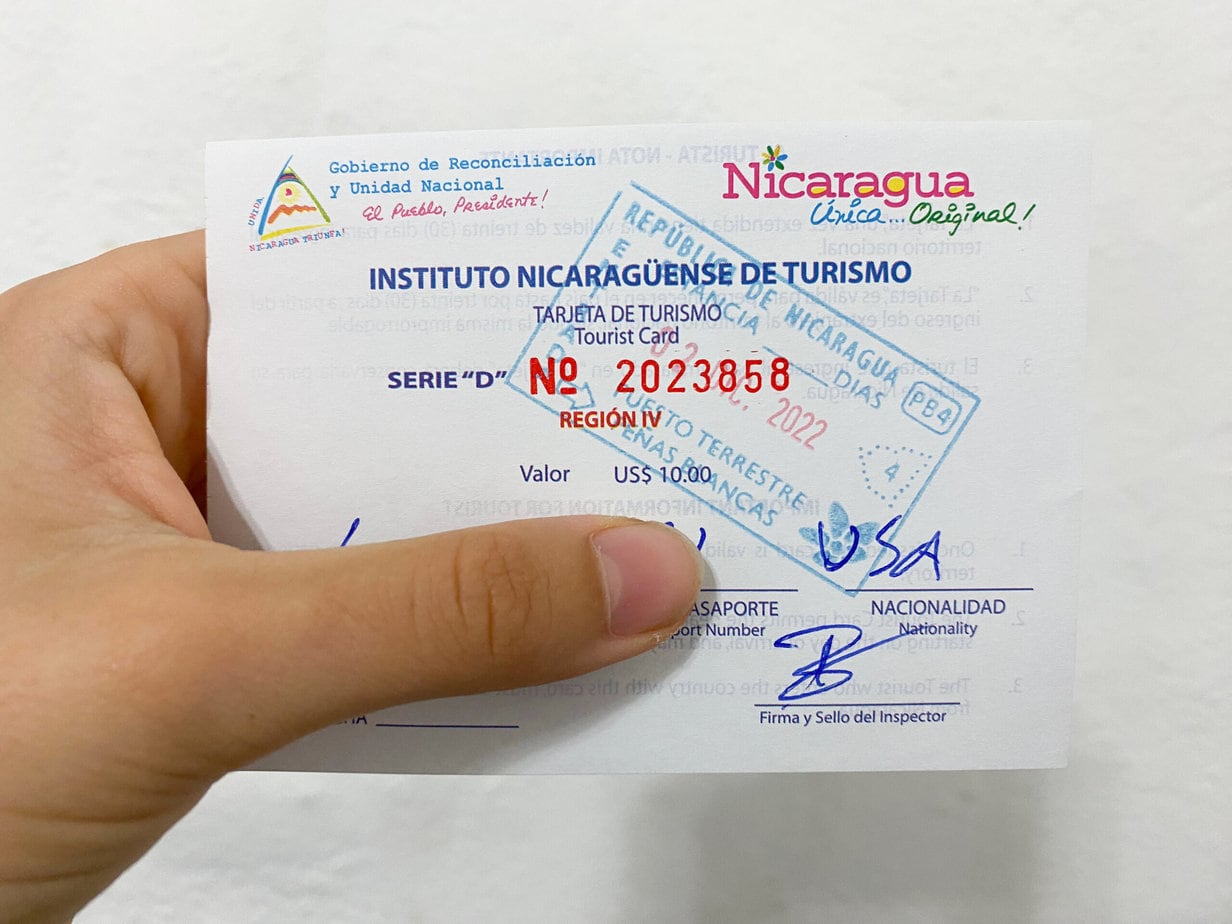
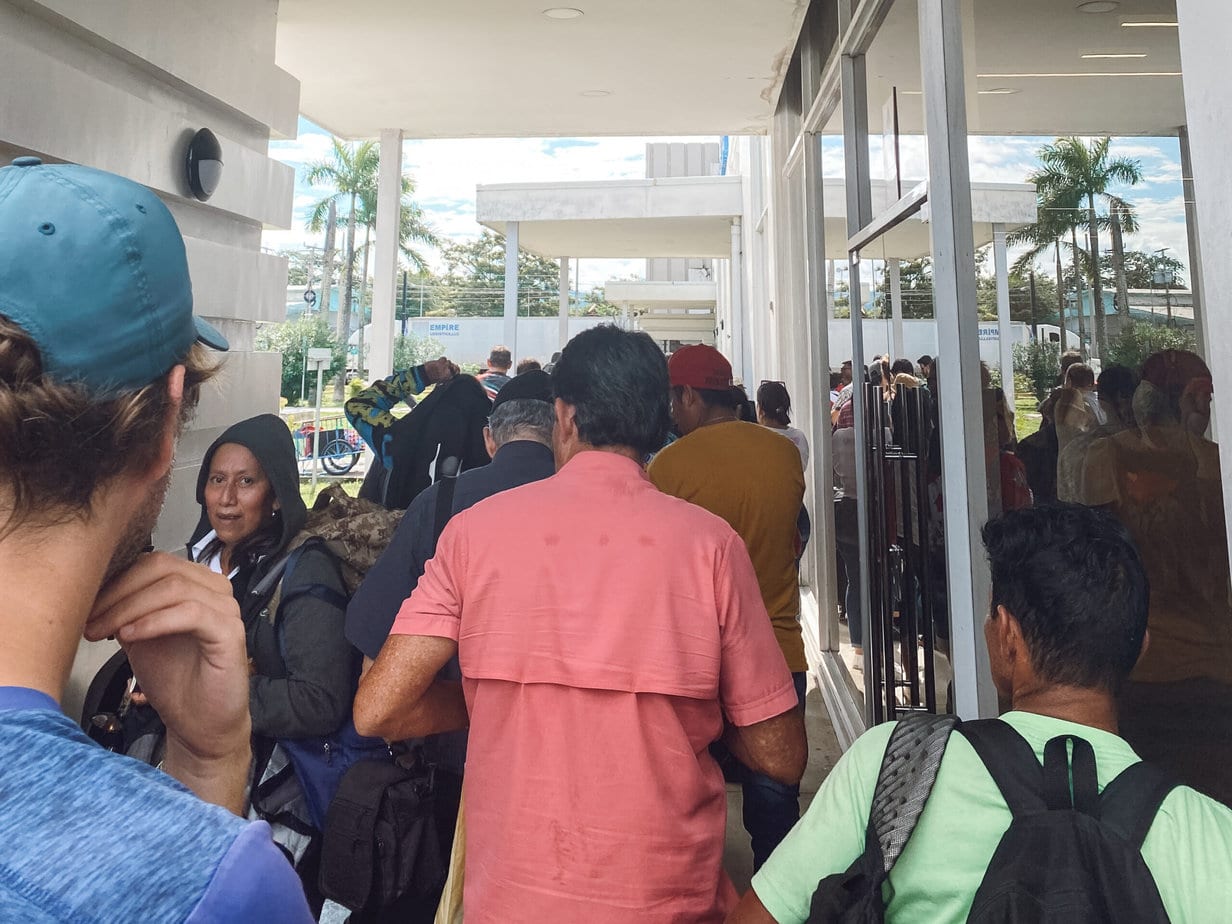
9. Enter Nicaragua
Next, we walked over to the main immigration building where we got in line. And what a line it was. We arrived around 1:30pm and waited in line until 3:15pm.
While waiting in line an immigration official came by and took a $1 USD per person “municipality tax.”
Once we got up to the main border agent we had to pay another tax. The Nicaragua entry tax was $14 USD per person. We were expecting it to be $13, but it was $14 so either we got scammed or inflation has made itself known here as well. (I’d be interested if you comment below what you get charged!)
The official asked us a few questions at this point – including our occupations. I recommend stating your occupation at home and not just saying you’re “traveling” because that can raise red flags about whether you’ll leave the country. I’ve also been told to avoid mentioning if you’re a journalist.
We were also given our Nicaragua entry cards at this point. DO NOT LOSE THIS!! This is a very unassuming piece of paper that they’ll probably tuck in your passport. You need to show it when you leave Nicaragua, or you could be fined $20+. Nobody tells you this at the border; most people learn it the hard way. So trust me – KEEP THIS CARD SAFE.
After getting our passport stamps, we walked past immigration and put our luggage through the scanners. And that was that!
Cost: $15 USD per person
Time: 2 hours
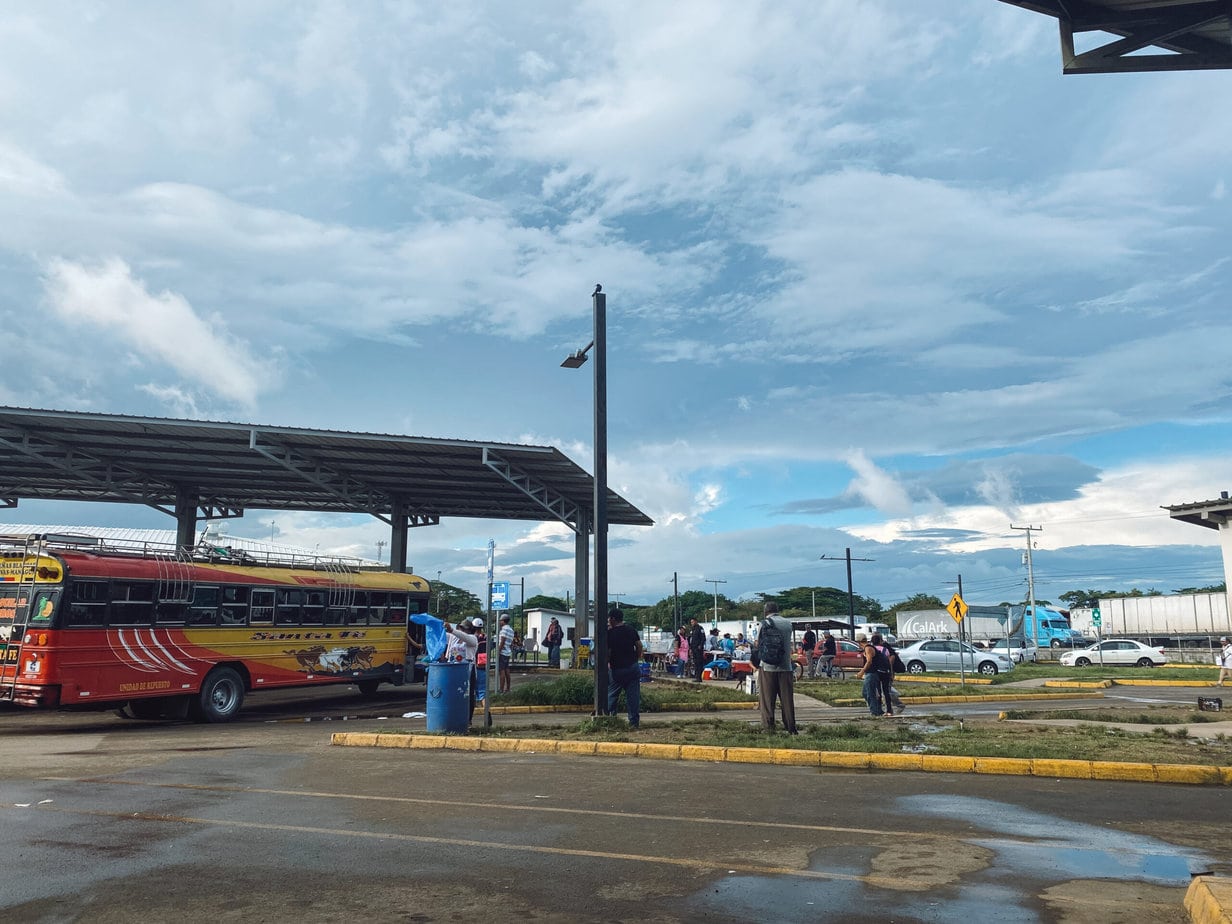
10. Chicken Bus to Penas Blancas – La Virgen via Rivas
At last! It’s time for your onward travel to, well, wherever you’re heading in Nicaragua. I discuss the various options more in depth in the next section. Personally, though, we were heading to San Juan del Sur, a beachy backpacker surf town on the Pacific Coast (for the record, this is where every other traveler was heading, too).
We took the iconic, cheap, and chaotic chicken buses all the way to San Juan del Sur (#ForTheBlog #ForTheBudget). However, I will say that as soon as you walk past the border grounds you’ll be bombarded by taxi drivers. They’ll offer $25 USD to San Juan del Sur, which you can barter down to $22 USD pretty easily. If you split this with other travelers, it’s a great deal.
To get to where the chicken buses leave, you need to walk through the mob of taxi drivers about 100m. There is a big parking lot with chicken buses on your left – it’s extremely obvious and you can’t miss it!
Once in the parking lot, we spoke to some locals who told us where to wait for the bus to Rivas. There are also buses leaving express to Managua, and you want to avoid these. Each bus has a big sign where it’s heading.
Get on the chicken bus to Rivas (ours left at 4:20pm – they leave every 30 to 45 minutes). For the most direct route to San Juan del Sur, sit near the front (if you can) and tell the driver you want to get off at “La Virgen” (pronounced “la beer-hen”). It cost us only 20 NIO (~$.55 USD). The journey took about 35 minutes and we got off the bus at 4:55pm.
Cost: 20 NIO / $.55 USD per person
Time: 1 hour
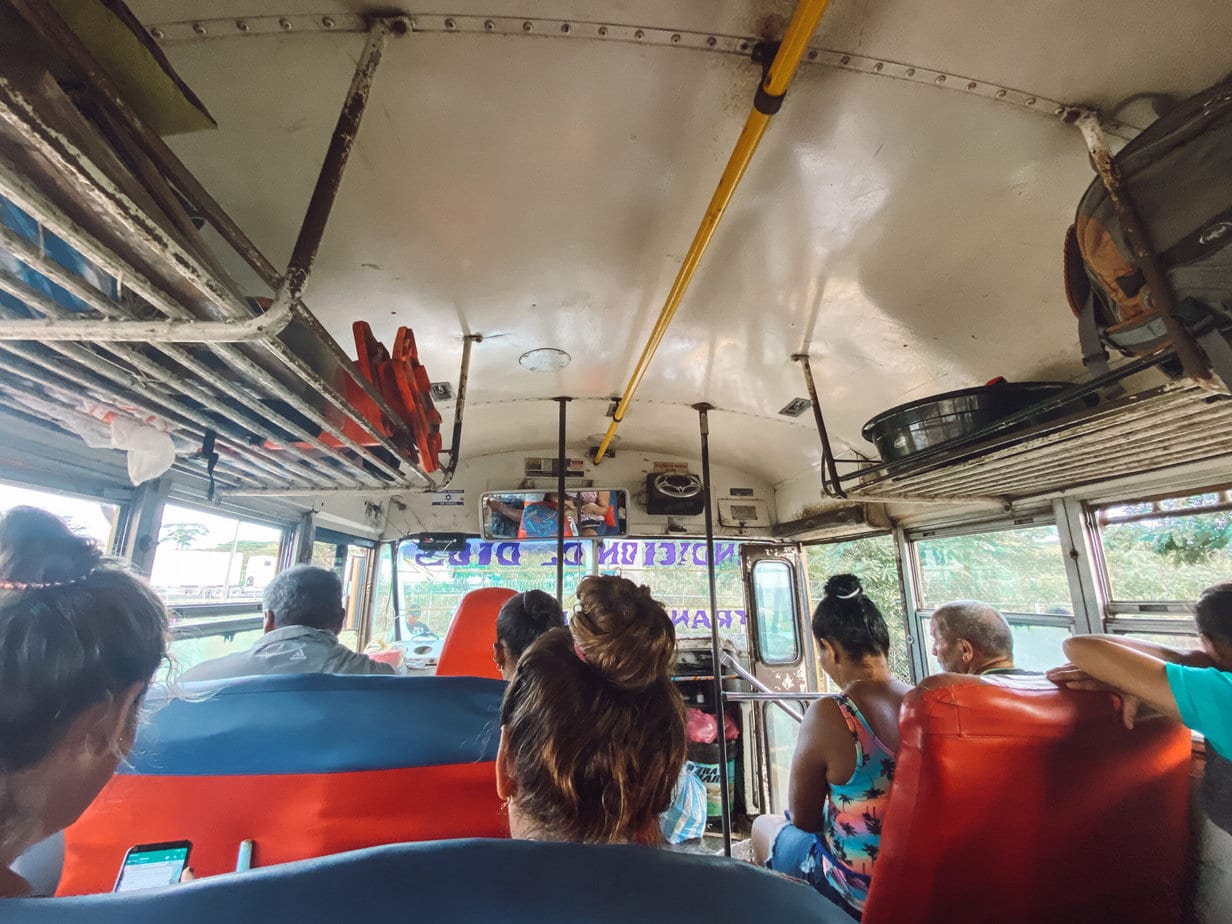
11. Chicken Bus to La Virgen – San Juan del Sur
After getting off the chicken bus in La Virgen, you are literally on the side of the road in the middle of nowhere (for this reason, you really do need to tell the driver where you want to get off, otherwise you’ll never see it and they’ll drive straight past).
Luckily, Dan and I found a couple other travelers doing the same route and we banded together. To get to where the next chicken bus leaves, you cross the main road (route 1) and turn onto the intersecting road (route 16). Search “La Virgen” on Google Maps and you’ll see.
We walked along route 16 for about 10 minutes staying on the right-hand side of the road (the direction for travel to San Juan del Sur). There is no bus stop or station for chicken buses, so we just kept our eyes out for it! Thankfully, a chicken bus zoomed past at about 5:20pm and we hopped on. It cost 30 NIO (~$.82 USD) and took about 20 minutes driving to reach San Juan del Sur. Once in SJDS, it was easy to walk to Saltwater Hostel, where we stayed and where I recommend!
Cost: 30 NIO / $.82 USD per person
Time: 45 minutes
Onward Travel From the Costa Rica Nicaragua Border
Chances are, you’re probably heading to San Juan del Sur, too. It’s an incredibly popular backpacker location. It was a little too party-central for my taste, but it’s a great first stop to get your bearings as it’s relatively close to the border. Just use my instructions above for onward travel to San Juan del Sur!
Other options for onward travel from the Costa Rica – Nicaragua border include:
- Ometepe: This double volcano island is a backpacker must-visit while in Nicaragua. It would be a rush to get here in one day from the border. You’d have to take the chicken bus to Rivas, a taxi or bus to San Jorge ferry terminal, and then a ferry to Ometepe. It’s achievable if you cross the border really early in the morning, though.
- Granada: The colorful colonial city I fell in love with in Nicaragua! Take the chicken bus to Rivas, and then another chicken bus to Granada. Again, it’s a long journey for one day especially if you’re coming from further afield in Costa Rica.
- Managua: Nicaragua’s capital city is not really a travel destination in itself, and it’s a bit seedy and unsafe. However it’s a good jumping off point for flights to the Corn Islands, or onward travel to Leon. The most direct route is the TransNica bus from San Jose, Costa Rica all the way through to Managua, Nicaragua.
For more onward travel plans, Rome2Rio is my go-to free tool to figure out travel routes. I will say that I found it pretty inaccurate for bus travel in Costa Rica to the border, and it doesn’t include any data on chicken buses. So, it’s a less reliable tool in this region than elsewhere.
Shuttle vs. Public Transport
At this point you may be wondering, why not just take a shuttle?
Undoubtedly, a private shuttle would be a LOT easier than the combination of chicken buses, public buses, and ubers we took during our border crossing adventure.
Actually, shuttle was our original plan – but it is just way too expensive to justify, at least for our travel budget.
Caribe Shuttle seems to be the highest recommended border crossing shuttle, but take the prices on their website with a grain of salt. They don’t include taxes, and more importantly, the shuttle needs a minimum of four people for you to get the listed price.
We contacted them about travel from La Fortuna to San Juan del Sur, but unfortunately the price we were quoted was $150 per person (whereas it says $66 per person on their website). We actually contacted them with two weeks’ notice, but unfortunately no other travelers joined to cut down the price.
Alternatively, it costs $45 per person (if the shuttle is full) from Liberia to San Juan del Sur. However it takes three different buses and basically a whole day of travel to reach Liberia from La Fortuna, so this was another no-go.
Note that those prices don’t include the $25 USD worth of exit and entry taxes at the border.
If you’re up for a bit of adventure, I recommend doing this border crossing by public transport rather than an expensive private shuttle. It’s a long day but not that difficult in the end, and you’ll save a ton of money.
Costa Rica to Nicaragua Border Crossing Overview
Everyone’s border crossing experience will be a little bit different. Ours is based on traveling from La Fortuna, Costa Rica to San Juan del Sur, Nicaragua. Traveling in a couple, we also get the benefit of splitting the uber cost. We also had a long two hour wait at this border, which I think is pretty normal and something you should consider in your plans.
Total time: 12 hours
Total cost: $37.03 USD per person
Safety Tips for the Costa Rica Nicaragua Border
Generally, I felt pretty safe at this border. There is a large traveler presence because this is the main border between Costa Rica and Nicaragua. Many “expats” (I hate that term) do border runs here so it is heavily trafficked and there is usually an English-speaking person around somewhere to help.
Saying that, you still need to have your wits about you.
In order to remain safe at the Costa Rica – Nicaragua border, here are a few tips:
- Have a secure zip pocket or fanny pack for your passport and vaccine cards. I found myself taking my passport out a LOT at this border. It would be easy to lose it in the hustle so I was really glad I had a fanny pack for this one. This is the passport case I use, and this is the travel fanny pack I use.
- Begin your day as early as possible, to give yourself plenty of daylight to complete the border crossing.
- Don’t cross the border at night.
- Try to join up with other travelers at the Nicaraguan border if you’re attempting the chicken buses. It can be hectic and confusing and I wouldn’t have felt comfortable doing this on my own (not due to anything sinister, but because it would be easy to get lost at La Virgen).
- Have USD cash with you, including exact change for a $10, $1, and $14 entry/exit taxes.
- Have some extra USD or CRC on hand to exchange into NIO at the border. This is what we did and although we lost a little bit in the exchange, we thought it was fair and worth it in order to enter a new country with a little cash on hand!
- Use your valuables (camera, phone, jewelry, wallet) discreetly.
Final Thoughts on the Costa Rica to Nicaragua Border Crossing
I really hope this guide was helpful to any fellow travelers attempting the Costa Rica to Nicaragua border crossing! It was our longest and most convoluted border crossing to date.
This is also the first article to detail the journey directly from La Fortuna – which was shocking to me as that’s such a popular tourist destination! So I really hope my firsthand account is useful to you if you’re in the same position.
If you find this guide helpful for your own border crossing journey, I’d really appreciate it if you leave a comment below. Let me know how your trip went, how much your entry/exit taxes were, and how long the line was (did we just get unlucky?!). I will keep this blog post updated so it remains useful for all of us!

Pin it for later…

Hey Sarah,
Thank you for this super helpful post!
My boyfriend and I are are thinking about attempting this in a couple weeks but in reverse – Leaving Nicaragua and crossing over to Costa Rica in the hope of making it to La Fortuna in one day.
You may not know as you were travelling in the opposite direction but do you know how frequent the buses leave Penas Blanca in Costa Rica?
Many Thanks & Happy Travels!
Lauren xx
Hi! Thanks for reading. Unfortunately I’m not sure how frequently the bus goes from Penas Blancas to Upala. Sorry I can’t be more help. It may be worth asking in the Backpacking Central America FB group. If you do find out when you do your border crossing, would you mind leaving a comment here with the info? I’m sure other people are reading this and wondering the same!
Hi Sarah
Thank you so much for all the tips, information and help with the border crossing.
It has helped me a lot!
Big love for all your work putting it together.
David 🙂
Hi
Thank you for this! We are getting the Tica bus next week up to Granada! We are not US citizens, so I am baffled why they don’t take anything other than US dollars! How annoying – I may tell them this and risk them accepting colones… but I may not!
Carley
Good luck! I found a lot of places throughout Costa Rica accepted USD or explicitly asked for this. To the point that almost every ATM in Costa Rica will also give you USD if you select it. To be on the safe side, I’d try to get some USD out of an ATM before your border crossing, personally!
I just crossed the border (may 10th 2023) and would like to update:
– you can pay the Costa Rica exit fee via qr code at the customs building itself with credit card.
They raised it to 8$.
Here is the link:
https://www.bancobcr.com/wps/portal/bcr/bancobcr/personas/solicitudes_en_linea/pago_impuesto_salida_terrestre
– whole process took us like 20 mins including waiting and walking.
– entry fee in Nicaragua was 13$ per person
-no atm around, bring cash also for the bus and food you want to buy
– on the Nicaraguan side we unfortunately followed a guy from the bus and said we only pay in the bus. Unfortunately the scamming system is very profound and he then charged us in the bus 10$/pax. Later a different guy (in uniform!) came around and charged all the locals a different amount. When he saw that we watched him to check the amount he turned his back towards us.
The locals watched the scam and were laughing, not the best welcome
—> make sure to ask the price before you head into the bus. Peñas to Managua should not be 10$/person but I do not know the correct price.
Also do Not pay anyone without uniform
The guide above helped us quite a lot and I would like to thank you for your work!
I just crossed the border (may 10th 2023) and would like to update:
– you can pay the Costa Rica exit fee via qr code at the customs building itself with credit card.
They raised it to 8$.
Here is the link:
https://www.bancobcr.com/wps/portal/bcr/bancobcr/personas/solicitudes_en_linea/pago_impuesto_salida_terrestre
– whole process took us like 20 mins including waiting and walking.
– entry fee in Nicaragua was 13$ per person
-no atm around, bring cash also for the bus and food you want to buy
– on the Nicaraguan side we unfortunately followed a guy from the bus and said we only pay in the bus. Unfortunately the scamming system is very profound and he then charged us in the bus 10$/pax. Later a different guy (in uniform!) came around and charged all the locals a different amount. When he saw that we watched him to check the amount he turned his back towards us.
The locals watched the scam and were laughing, not the best welcome
—> make sure to ask the price before you head into the bus. Peñas to Managua should not be 10$/person but I do not know the correct price.
Anyway the guide above helped us quite a lot. Thank you for that effort!
Two hours in line sounds like a breeze to me!
I have spent literal hours at this border every time I crossed it. I have crossed this border to both directions in 2010, 2012 and 2015. The first time we were stuck at the Costa Rican side alone for about 6hours. Every single time the actual time spent from arriving at the border to leaving it has been 6+ hours. A lot of the time it was just random waiting around or waiting for the bus to be checked.
My favorite memory is from 2010 when me and a friend accidentally walked across the no man’s land (wasn’t this fancy looking back then) as we lost our TicaBus. So once we were at the Nicaraguan side and finally found the bus, the driver told us to go to this random building at the side of the complex, ask for Fernando and give him our passports. So that’s what we did and luckily it all turned out fine in the end.
So interesting to see from your pictures how much the Nicaraguan side has developed! It used to be sketchy af, and with minimal shade from the sun.
Hi, thanks for this! We are planning to cross the border later in the day, by the time we are ready to catch our bus to Rivas it may be 6/7pm or even later if there are delays. Do you know when is the latest bus going from the border to Rivas? Cant find any bus schedules anywhere online
Personally I wouldn’t recommend crossing any border at night due to safety concerns, better to wait until the next morning if possible!
Thanks so much for the guide. We followed your route today from Panama to Puerto Jimenez.
Updates:
Albrook Terminal to David they charge 20 USD now.
The Immigration office on the Costa Rica side is 5km into Costa Rica, just continue straight after leaving Panama.
There are signs pointing in that direction. Shortly after leaving Panama you will find a bus stop on the left hand side where you can jump into a bus for 1 USD to get to the brand new migration office. The buses have signs going to ciudad Nelly or Golfito.
It seemed weird when the taxi drivers told us that we need a taxi to get to Costa Rica migration but they were right.
This was such a useful blog post! I did the border crossing today, and it’s a lot simpler without any of the health card checks.
From El Tanque, the bus arrived at 7:20am. It had a sign for Penas Blancas, and that’s where I told the driver I was going. The bus was also white. Ticket was about 4,000 CRC, but that’s the only ticket I bought to the border. The stops written above are as described.
Pay the Costa Rica exit tax online, then Costa Rica immigration becomes a breeze, as they look on the system with your passport number and don’t ask you any questions. Quick stamp and I was off.
Nicaragua border was about 4 hours in a hot mid-day sun… It’s was a long ‘un…
Exit tax is $13, + $1 when you enter the building.
Make sure you’ve got your hotel written down, and pass them the piece of paper – speeds things up!
Never checked Yellow Fever, or any other health card checks.
Taxis to San Juan del Sur started at $40, I got mine down to $32, but probs still paid too much.
Hi Sarah!
Thanks so much for all the information, it was super useful! We did pretty much the exact same crossing yesterday and this was very helpful. I just wanted to add some notes:
We also asked around at the bus station in La Fortuna and the locals told us that there is also a route passing through Cañas and Liberia (with 3 bus changes) that would take approximately the same time, but we didn’t want to risk the amount of changes.
Bus stop in El Tanque is now conveniently called ‘bus stop to Peñas Blancas’ on google maps. We were told the bus could come between 6:45 and 7:15, we were there at 6:40 (by uber) the bus came at 7:10. It cost us 5660 colonnes for two people, you pay the bus driver and you can also pay with US dollars.
It was about two hours to Upala from there, and there we had to take out our luggage and buy new tickets at the bus station. It was 4060 colonnes for two people. A different bus came at 10am to take us to Peñas Blancas. This was a crowded bus and a very bumpy ride through the rural north of Costa Rica. We arrived at Peñas Blancas around 2pm.
We didn’t see any of the exit tax houses so we went straight into the Costa Rica migration building where there were two (new-looking) machines and a QR code to pay the exit tax of 8 us dollars. After that we used the free bathroom (great tip!) and walked to the Nicaraguan building. It was quite empty in no-man’s land, but we just followed the green signs with two other backpackers who were on the same route from La Fortuna to SJDS. At the health building they told us no health checks were needed. The line in the Nicaraguan immigration was not too long, it took maybe half an hour for us, but the most time was actually getting through customs! There was some line-cutting by locals who paid the officials a little extra while we were standing at his desk! Anyway we weren’t asked too many questions, maybe good to note here that for people with a European citizenship there is an online form you can fill out beforehand (it’s recommended to do this 7 days in advance, we did it 2 days before crossing and got an authorization email 1 day later). They didn’t mention it but I think it helped and I read online that other people got fined for not having it. Then we paid the entry tax which was 13$ (10$ for a tourist card and 3$ for immigration tax, it says to ask for a receipt. oh yeah we also paid the 1$ municipal tax at entering the immigration building. Then we went to put our bags in the scanners and as you might now they are very strict on things like drones, but also apparently binoculars! I brought a very old one, but haven’t used it once, but they made a whole fuss about it and me and another one of the backpackers who had a more expensive binoculars were taken to a separate desk. We had to fill out a small declaration form, the others didn’t and the customs lady walked off with this form, our binoculars and our passports. She came back after a while, but no idea what she did exactly, and she gave us back our binoculars after checking that they didn’t have night vision. This took the most time, so to avoid the fuss maybe don’t bring binoculars? Maybe we’ll still get in trouble for this when exiting Nicaragu
Anyway after that we got to leave and it was just after 3, so all in all not a bad score. We found the bus stop after avoiding taxi drivers and people offering cordobas for dollars and we asked the locals for the bus to Rivas. Bus came at 3.20 and the bus driver knew exactly where we and the other backpackers were headed: San Juan del Sur. I asked about La Virgen and he dropped us of there. Here its good to have small change, the other backpckers didn’t, so not sure how much we paid but it was less than 3 dollars for the four of us (so might be still the same price you paid). At La Virgen the bus stop to SJDS is now also conveniently called that on google mals so it was easy to find and there was a local waiting there as well. Bus came 5 minutes later and here they charged us 2 dollars per person (so more than you paid) but maybe it was also for our big backpacks? Anyway still cheaper than a taxi, and fast, we were in SJDS at 16.30. All in all super smooth, mostly thanks to your info!! It became quite a long comment, but I hope this helps other travellers as well 🙂
Dear Sarah, thank you very much for this post. It encouraged me to keep my plans to travel to Nicaragua from La Fortuna.
I’m just back from my trip and I can tell your guide it’s still pretty much up to date. Here are some notes from April 2025:
– Arrived at the bus stop in El Tanque around 6:40 and got the bus around 7:30. Paid 4500 Colons to Peñas Blancas. Bus driver said the bus would be going direct to the border. However he gave us piece of paper that later we would use to board again the same bus in Uppala. Yes, the bus made a stop there and left at 11:00.
– There are now Costa Rica officers outside the immigration building facilitating the payment of the exit tax. It costed me 10 dollars.
– On the Nicaragua side of the board, I first went to little health house you mentioned in your post. I showed my yellow fever vaccination card, the lady there said it was indeed need (I’m from Brazil) but got nothing in return. However inside the building no one asked for anything related to vaccine. The entry tax was 13 dollars. Since I managed to get inside before the Ticabus passengers, the line was not long and that part of the process took me about 25 minutes.
– Already in Nicaragua, I went to the chicken bus stop and got my bus to Ricas (I was on my way to Ometepe). I forgot to exchange money, but they accepted dollars to pay for the 45 minute ride. It costed me 1 dollar.
– In Rivas, I took a taxi to the Puerto San Jorge (tourist price is 10 dollars, regular price should be no less than 50 Cordobas) and got the ticket to the ferry to the Island (another 50 Cordobas).
– I kept the tourist tickets you get at Nica immigration office but they were not requested when leaving Nicaragua.